
- Frenado proporcional por inercia: sensores de alta precisión en la pantalla y en el módulo miden la desaceleración real y ajustan la potencia de frenado del remolque en proporción, logrando frenadas suaves y unificadas en lugar de tirones bruscos. La salida aumenta en pendientes, curvas y firmes irregulares.
- Eléctrico y electrohidráulico: un modo de freno seleccionable en el menú controla tanto frenos de tambor electromagnéticos estándar como actuadores electrohidráulicos, en remolques y caravanas de 1 a 4 ejes.
- 8 perfiles de remolque en memoria: guarda tipo de freno, potencia y boost para hasta 8 remolques distintos. Mantén pulsado el botón S 2 segundos para cambiar de perfil al instante y remolcar otro remolque sin volver a calibrar.
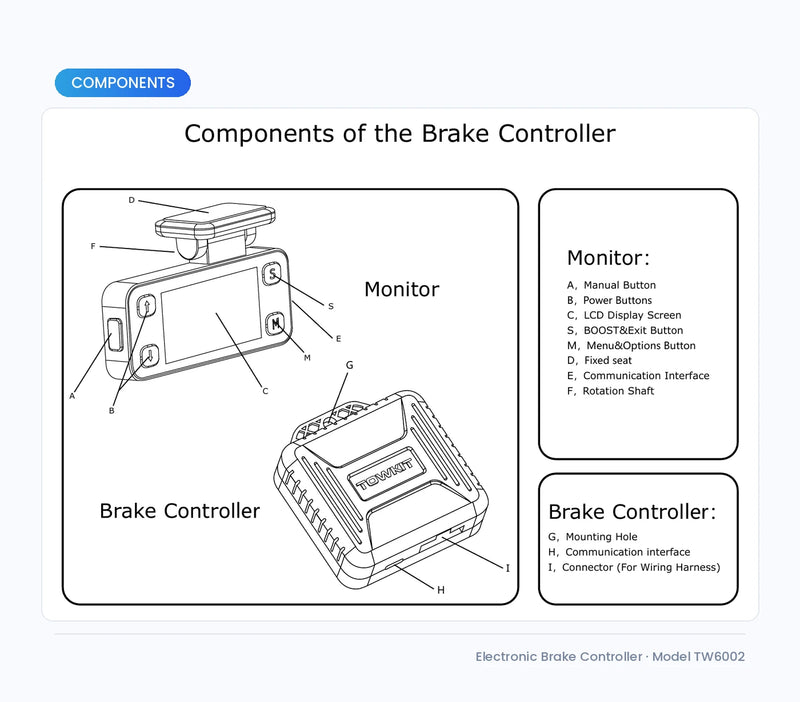
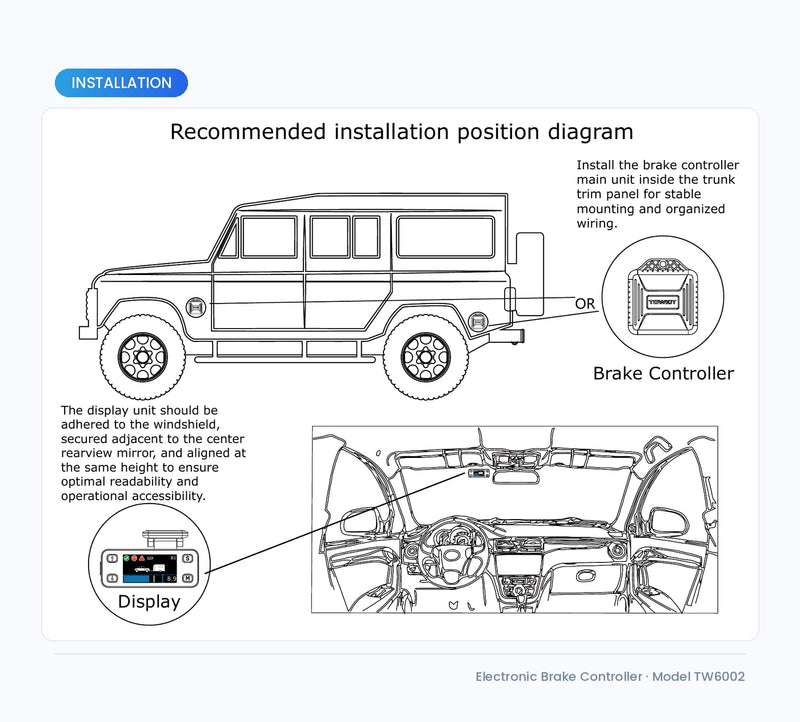
- Diseño dividido patentado: el módulo se instala en cualquier punto del habitáculo sin restricción de ángulo, y la pantalla ultrafina se fija al parabrisas sin ocupar el salpicadero. La pantalla se inclina 360 grados para una lectura clara desde cualquier asiento.
- Nivelación con un toque: se autonivela al encender, o aparca en terreno plano y calíbrala desde el menú (o mantén M 3 segundos). Vuelve a nivelar en menos de un minuto cada vez que muevas la unidad.
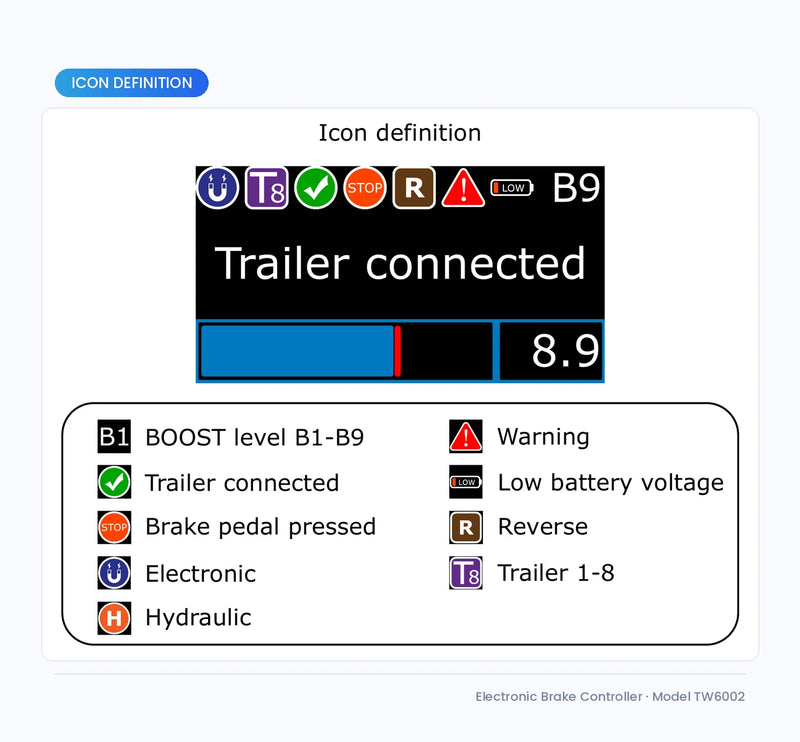
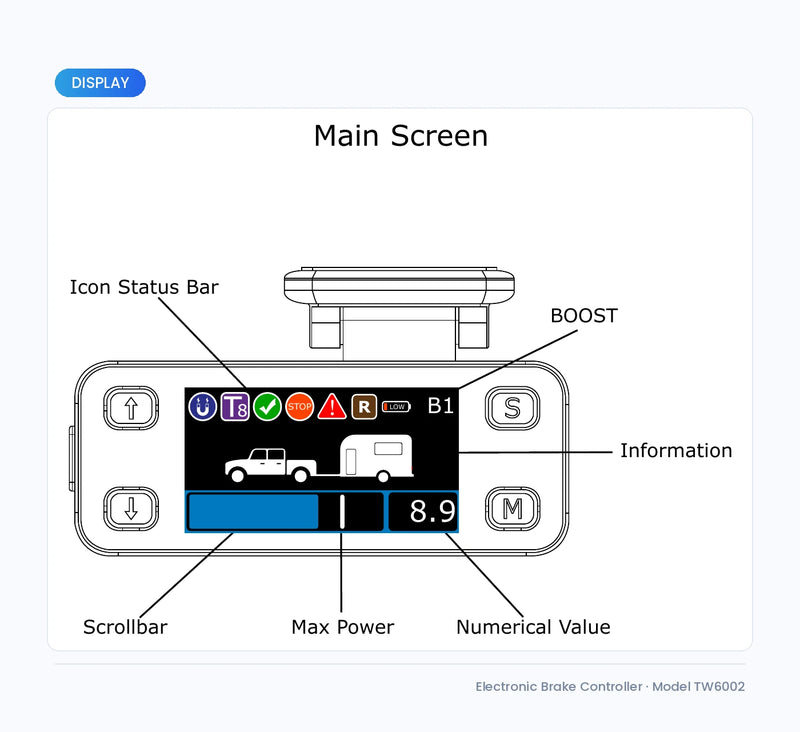
- Pantalla IPS a color: muestra la potencia de frenado en tiempo real, el ajuste máximo, el nivel de boost e iconos de estado de remolque conectado, freno aplicado, aviso y tensión baja. Cuatro niveles de brillo.
- Nueve niveles de boost (B1-B9): cada paso aumenta la sensibilidad del sensor y acorta el tiempo de respuesta (del 0 al 40 por ciento), para que el remolque frene con más fuerza y antes. Ajustable en marcha con el botón S.
- Freno manual con rampa seleccionable: aplica los frenos del remolque de forma independiente para controlar el balanceo, con rampa rápida, normal o lenta (0,5 / 1,0 / 1,5 segundos). Activación opcional de las luces de freno para avisar al vehículo de detrás.
- Modo marcha atrás: pausa el boost y la retención durante 3 minutos para que dar marcha atrás sea suave, y luego restaura tus ajustes automáticamente.
- Retención en parado: mantener el pedal más de 3 segundos aplica aproximadamente un 25 por ciento de potencia para evitar que el remolque se desplace.
- Diagnóstico y protección completos: avisos en lenguaje claro de remolque conectado, desconectado, error de masa, error de alimentación, salida en cortocircuito, sobrecarga de salida, cortocircuito del remolque y tensión baja, además de lectura en vivo de tensión de alimentación, tensión de entrada y corriente de salida.
- Siempre activo, consumo mínimo en reposo: la alimentación constante permite frenar el remolque incluso con el vehículo apagado, con solo 4,5 mA en reposo, sin riesgo para la batería.
- Carcasa de aluminio CNC con cristal integrado y chip de grado automotriz, diseñada para soportar los ciclos térmicos del parabrisas sin deformarse ni decolorarse.
- Instalación universal de 4 cables: negro al positivo de la batería (mediante el portafusibles autorrearmable de 20/30 A incluido), rojo a la señal de las luces de freno, blanco a masa del chasis, azul a la salida del remolque, con cable de cobre 14-12 AWG. Menú disponible en inglés y chino.


Electric Brake Controller | Proportional, Fits All 12V Tow Vehicles
Precio regular
$338.00
Precio de venta
$338.00
Precio regular
Precio unitario
Ahorre
Quick Answer
60-second summary
Proportional electric brake controller for trailers and caravans with electric or electro-hydraulic brakes, 1-4 axles. Split design mounts at any angle and stores up to 8 trailer profiles. Works on any 12V tow vehicle - petrol, diesel, hybrid or EV - with no vehicle-specific coding.
Install time
60-90 minutes DIY. Under 1 hour with an auto electrician.
Drilling
No - plug-in 4-wire loom, a...
Warranty
Yes - no factory loom cutti...
Guaranteed Fit — Zero Purchase Risk
Verified for your vehicle. If these parts don't fit, we cover return shipping and issue a full refund. No questions asked.
Confirm this fits your vehicle
Volume Discount — More Sets, More Savings
1 Set
Standard price
$338.00
2 Sets
Save 10% — $304.20 each
$608.40
$676.00
3 Sets
Save 15% — $287.30 each ★ Best value
$861.90
$1,014.00
-
Entrega estimada:Sep 21 - Sep 25
-
¡Envío aéreo exprés gratuito en pedidos superiores a $100!

Electric Brake Controller | Proportional, Fits All 12V Tow Vehicles
Precio regular
$338.00
Precio de venta
$338.00
Precio regular
Precio unitario
Ajuste de Precisión Garantizado
Cada pieza verificada con datos OEM del vehículo. Garantizado que encajará en tu vehículo — o cubrimos el envío de devolución y reembolsamos el importe íntegro.
Diseñado para Plataformas EV
Piezas diseñadas para BYD, Tesla, MG, GWM y KIA — calidad de especificación OEM, probadas para sistemas eléctricos EV y compatibilidad de pinzas de freno.
Tus Piezas, Tus Condiciones
Pagos divididos con Zip, Afterpay o Shop Pay. Opciones sin intereses — aprobado en segundos en el checkout, sin formularios requeridos.
Características y Beneficios
Lo que Incluye
Galería del Producto
🔧 Ajuste Universal — Compatible con la mayoría de vehículos
Por favor verifica la compatibilidad antes de comprar. Contáctanos con tu VIN para confirmación.
¿No estás seguro de la compatibilidad? Contáctanos — confirmaremos en 24 horas.
Tiempo total
60-90 minutes DIY. Under 1 hour with an auto electrician.
Requiere taladrar
No - plug-in 4-wire loom, adhesive windscreen mount for the display.
Garantía
Yes - no factory loom cutting. Fused direct-to-battery feed keeps vehicle warranty intact.
Any 12V negative-earth tow vehicle - petrol, diesel, hybrid, PHEV or fully electric. There is no vehicle-specific coding, module matching or brand restriction. The four-wire loom connects to battery positive, chassis earth, the stoplight signal wire and the trailer brake output.
Electric (electromagnetic) and electro-hydraulic drum/actuator brakes, on 1 to 4 axles. Select the matching mode in the menu so the controller detects the trailer and its faults correctly. It does not work with hydraulic surge/override couplings or air brakes. Use a 20A fuse for 1-2 axles and a 30A fuse for 3-4 axles.
No. This is a 12V-only controller. Connecting it to a 24V system will destroy the circuit board and is not covered by warranty.
Yes. It stores up to 8 trailer profiles, each remembering brake type, power and boost. Hold the S button for 2 seconds on the main screen to switch trailers instantly - no re-tuning when you swap between a box trailer and a caravan.
Fully proportional. High-precision sensors in both the display and the main unit read the tow vehicle's actual rate of deceleration and scale the trailer brake output to match, including increasing output proportionally on gradients, through corners and over rough surfaces. Boost has 9 levels (B1-B9, 0-40%).
No. The patented split design means the main unit can be fixed anywhere inside the cabin at any orientation. After mounting, park on level ground and calibrate the sensor from the menu (it also auto-levels on power-up, or hold the M button for 3 seconds). The controller then uses that position as its baseline. Skip levelling, or do it on a slope, and output power will be inaccurate.
Yes. With the brake pedal pressed, hold the S button to enter reverse mode - boost and auto-hold pause for 3 minutes so backing up stays smooth. Press S again or wait, and it restores your previous settings automatically.
Yes. A dedicated manual brake button applies trailer brakes independently of the tow vehicle, with a selectable fast/normal/slow ramp-up (0.5, 1.0 or 1.5 seconds). Stoplight activation can also be switched on so the vehicle behind sees you are slowing.
Hold the brake pedal for more than 3 seconds at a standstill and the controller applies about 25 percent power to hold the trailer, similar to an auto-hold function.
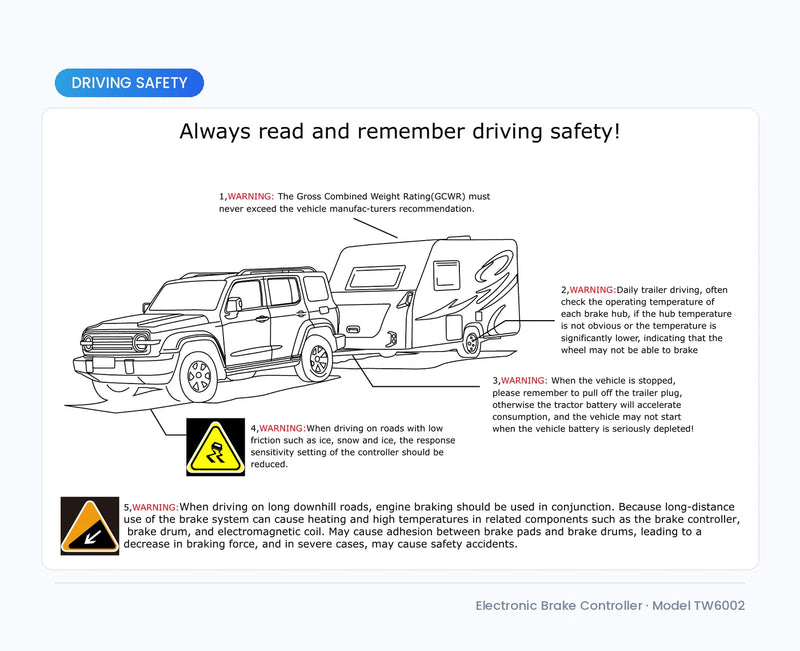
The black wire must run directly to the battery positive via the supplied auto-reset fuse - never the cigarette lighter or ignition switch. Keep it permanently live so the controller can still brake the trailer in an emergency with the vehicle off. Standby draw is only 4.5mA, so battery drain is negligible.
This is almost always an earthing problem. The white wire must reach clean, paint-free metal, or run directly to the battery negative terminal. The screen shows 'Ground error' when the earth is lost. It also reports Power error, Output shorted, Output overload, Trailer short and Power low in plain language, so you can pinpoint the fault.
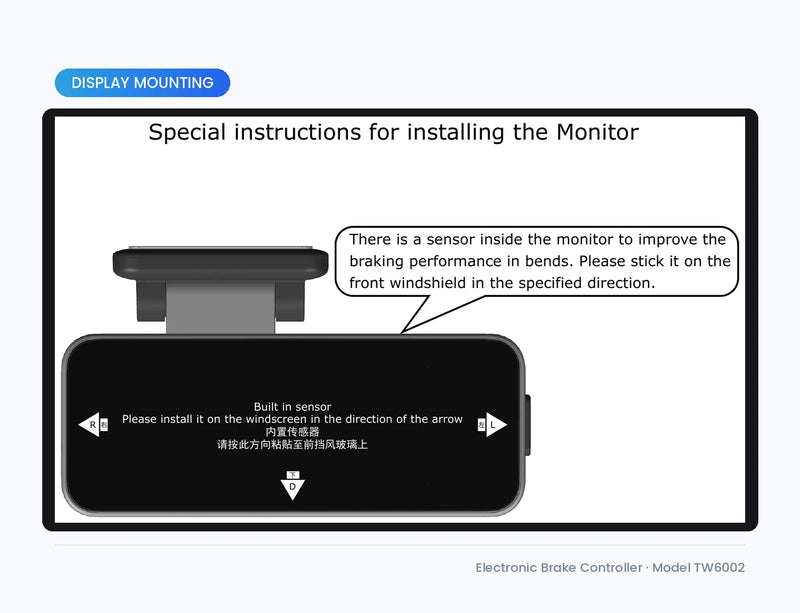
No. The slimline display clips to the windscreen like a dash cam, ideally at rear-view mirror height, and tilts through 360 degrees. It contains a sensor, so it must be stuck on the right way up using the L / R / D arrows on the back - the wrong orientation reduces cornering brake performance. Only the display goes on the glass; the main unit is hidden elsewhere in the cabin.
Not currently. The menu shows a Bluetooth option, but app connectivity is not yet activated by the manufacturer and no phone control service is offered. All functions are operated from the display unit.
It bypasses the sensor and sends your set power straight to the trailer. Because a proportional controller outputs very little while the vehicle is stationary, this mode lets the trailer reach a compliant braking figure on a roller brake tester, and is also useful for brake maintenance. Use it during testing only, and long-press the S button to exit before driving.
No. Installation does not require cutting the factory loom or drilling the body. The controller takes a fused feed from the battery and taps the stoplight signal, and can be removed without trace. We recommend an auto electrician for the stoplight and earth connections.
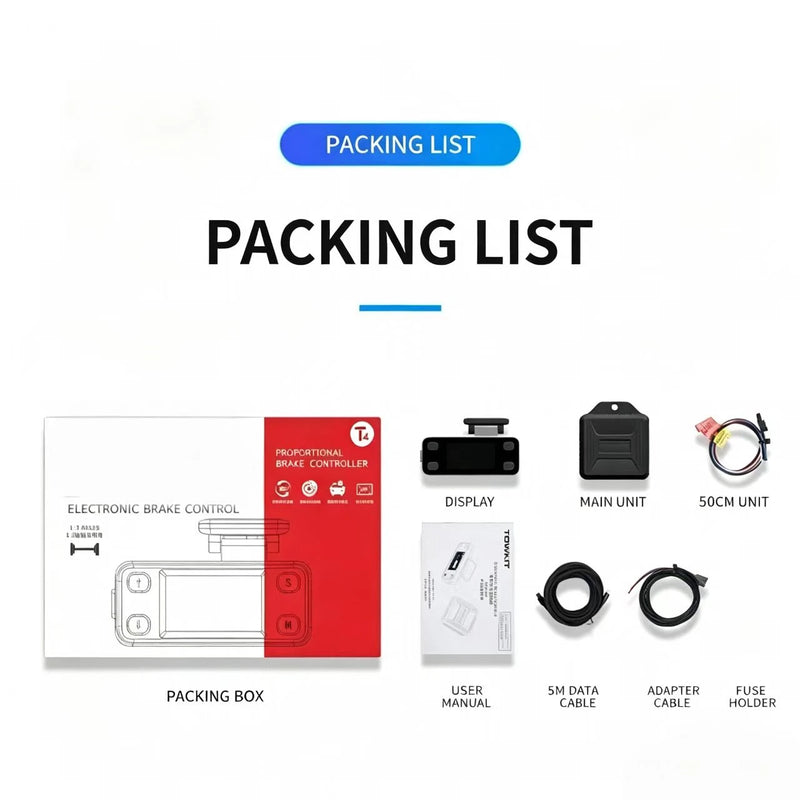
Display unit, main control unit, a 5.5m data cable between them, a 50cm 4-wire external harness, an adapter cable, an auto-reset fuse holder (20A/30A) and an English/Chinese manual.
Usa el selector de vehículo en la parte superior de esta página para confirmar la compatibilidad con tu año, marca y modelo específicos. Si tu vehículo no está listado o no estás seguro, contáctanos en support@evparts4x4.com con tu VIN — confirmaremos la compatibilidad en 24 horas. Nuestra política de Ajuste Garantizado significa que si hay un problema de compatibilidad de nuestra parte, lo solucionaremos.
Los pedidos se procesan y despachan en 2-4 días hábiles. Las piezas estándar se envían por correo aéreo y normalmente llegan en 10-15 días hábiles; las piezas de carrocería más grandes se envían por flete marítimo y tardan alrededor de 30-45 días hábiles. El envío es gratis en pedidos superiores a $100. Recibirás un número de seguimiento una vez que tu pedido sea enviado, y puedes rastrearlo en cualquier momento aquí. Detalles completos en nuestra Política de Envío.
Sí — ofrecemos una ventana de devolución de 30 días desde la fecha de entrega, y no cobramos ningún cargo de reposición. Si un artículo llega dañado o no es correcto por nuestra parte, organizaremos un reemplazo o reembolso completo y cubriremos el envío de devolución. Para los términos completos, consulta nuestra Política de Devolución y Reembolso o inicia una devolución a través de nuestra página de RMA.
No proporcionamos instalación directamente, pero la mayoría de nuestras piezas están diseñadas para una instalación DIY directa — la guía paso a paso está en la pestaña de Guía de Instalación arriba. Para piezas complejas (por ejemplo, frenos, suspensión, sistemas eléctricos), recomendamos que un mecánico calificado realice la instalación. Si tienes preguntas técnicas durante la instalación, nuestro equipo de soporte está feliz de ayudar en support@evparts4x4.com.
