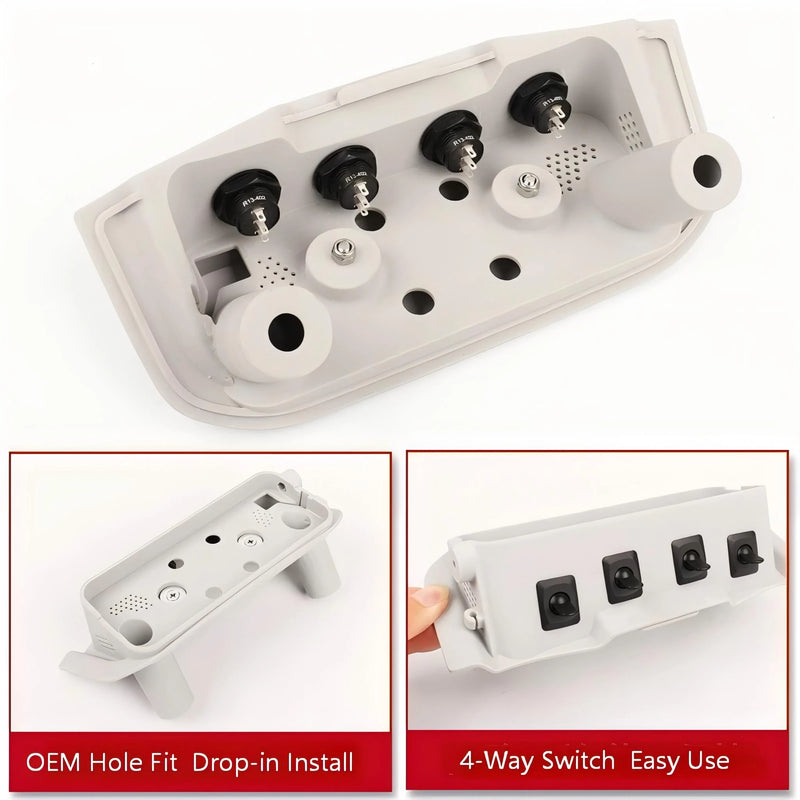
- Integración en la cabina con doble función:Combina el soporte para radios UHF/VHF con un panel de interruptores auxiliares de cuatro posiciones, lo que permite convertir el espacio superior en un centro de control de iluminación y comunicaciones de nivel profesional.
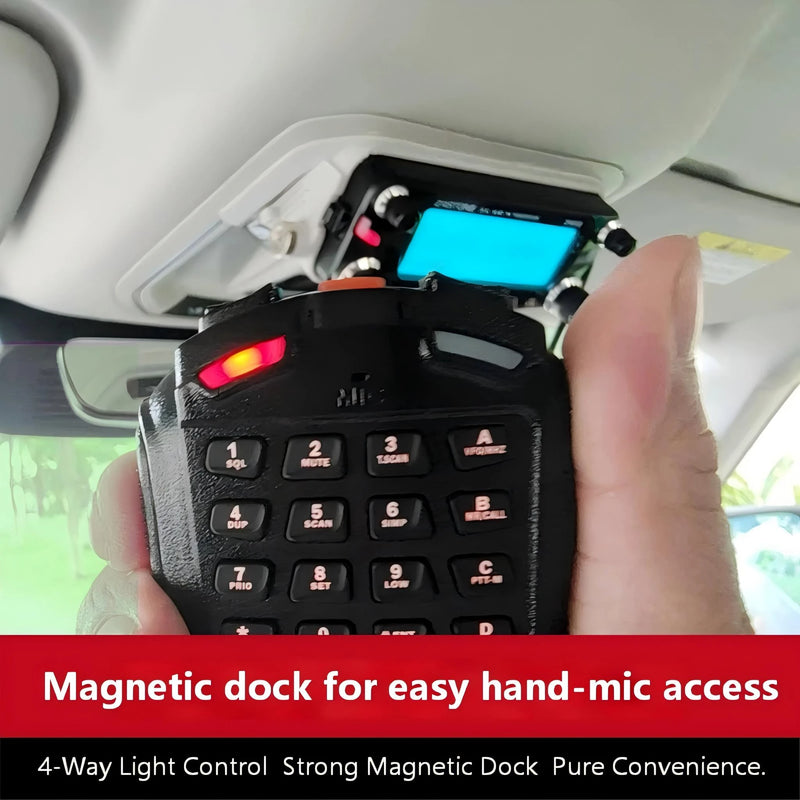
- Ergonomía al estilo de una cabina de pilotaje:Traslada los mandos al techo para despejar la abarrotada consola central, situando las pantallas de la radio a la altura de los ojos por motivos de seguridad y colocando los interruptores al alcance de la mano de forma intuitiva.
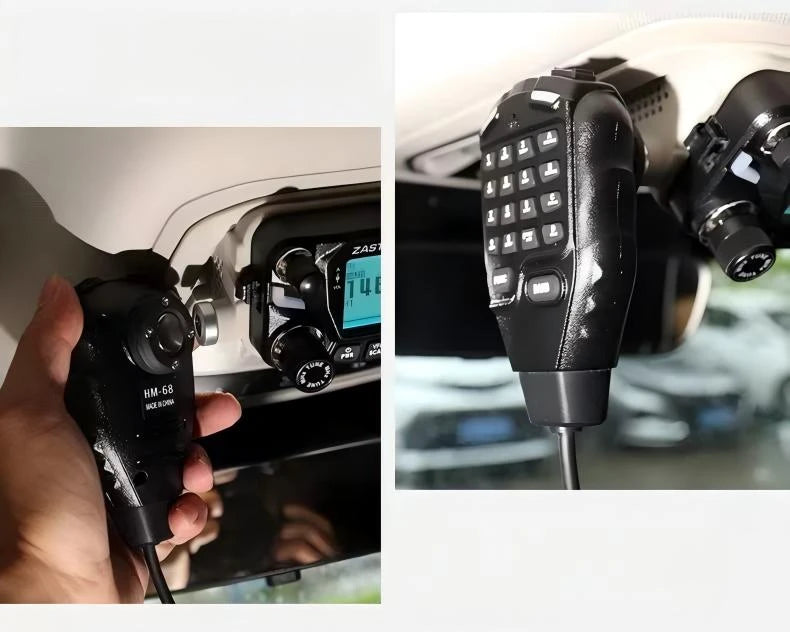
- Compatibilidad con radios modulares:Diseñado con carátulas intercambiables para adaptarse a las radios Yaesu, Icom, Zastone y Hengxun, con marcos cortados con precisión que garantizan un ajuste perfecto, como el de fábrica.
- Soporte magnético para micrófono «Snap-and-Go»:El soporte magnético integrado de alta resistencia sujeta con seguridad los micrófonos de mano sin que se te resbalen, lo que lo hace ideal para conducir por caminos accidentados.
- Instalación no destructiva:Sustituye al soporte original para gafas de sol utilizando los orificios de tornillos de fábrica ya existentes; no es necesario taladrar ni cortar, lo que preserva el valor de reventa y permite una reversibilidad total.
- Control centralizado de la iluminación:Los interruptores basculantes físicos de cuatro posiciones permiten controlar de forma táctil y fiable las barras de luces del techo, las luces de zanja y las luces de campamento sin necesidad de un cableado complejo.


Soporte de radio de techo para Gwm Tank con panel de interruptores de 4 vías y soporte magnético para micrófono
Precio regular
$290.00
Precio de venta
$290.00
Precio regular
Precio unitario
Ahorre
Quick Answer
60-second summary
Soporte aéreo profesional UHF/VHF para radio con panel de interruptores de 4 vías integrado y base magnética para micrófono para GWM Tank 300 / 400 / 500. Instalación no destructiva utilizando los orificios de tornillo de fábrica; compatible con radios Yaesu, Icom, Zastone y Hengxun con capacidad de placa frontal modular.
Install time
60-90 minutos
Drilling
No - atornillado
Warranty
Sí - reversible
Guaranteed Fit — Zero Purchase Risk
Verified for your vehicle. If these parts don't fit, we cover return shipping and issue a full refund. No questions asked.
Confirm this fits your vehicle
Volume Discount — More Sets, More Savings
1 Set
Standard price
$290.00
2 Sets
Save 10% — $261.00 each
$522.00
$580.00
3 Sets
Save 15% — $246.50 each ★ Best value
$739.50
$870.00
-
Entrega estimada:Aug 03 - Aug 07
-
¡Envío aéreo exprés gratuito en pedidos superiores a $100!

Soporte de radio de techo para Gwm Tank con panel de interruptores de 4 vías y soporte magnético para micrófono
Ajuste de Precisión Garantizado
Cada pieza verificada con datos OEM del vehículo. Garantizado que encajará en tu vehículo — o cubrimos el envío de devolución y reembolsamos el importe íntegro.
Diseñado para Plataformas EV
Piezas diseñadas para BYD, Tesla, MG, GWM y KIA — calidad de especificación OEM, probadas para sistemas eléctricos EV y compatibilidad de pinzas de freno.
Tus Piezas, Tus Condiciones
Pagos divididos con Zip, Afterpay o Shop Pay. Opciones sin intereses — aprobado en segundos en el checkout, sin formularios requeridos.
Características y Beneficios
Lo que Incluye
Galería del Producto
Vehículos compatibles confirmados para esta pieza. Usa el selector de vehículo arriba para verificar la compatibilidad de tu auto específico.
| Rango de Año | Marca | Modelo |
|---|---|---|
| 2022-2026 | GWM | Tank 300 |
| 2024-2026 | GWM | Tank 400 |
| 2023-2026 | GWM | Tank 500 |
⚠ Nota de compatibilidad
Para compatibilidad con modelos, años o variantes específicos, envíe su número de bastidor (VIN) o los detalles de su vehículo a support@evparts4x4.com; le confirmaremos la compatibilidad en un plazo de 24 horas.
¿No estás seguro de la compatibilidad? Contáctanos — confirmaremos en 24 horas.
Tiempo total
60-90 minutos
Requiere taladrar
No - atornillado
Garantía
Sí - reversible
Sí, ofrecemos compatibilidad con los tres modelos. El Tank 300 es compatible con los años de modelo 2022–2026, el Tank 400 con 2024–2026 y el Tank 500 con 2023–2026. Seleccione el modelo de su vehículo al elegir su SKU para asegurarse de recibir el adaptador de placa frontal correcto para su radio.
Cada SKU combina su modelo de GWM Tank (300, 400 o 500) con un adaptador de placa frontal intercambiable de una marca de radio específica. Por ejemplo, el SKU1 es el Tank 300 con Yaesu FTM-200DR, mientras que el SKU5 es el Tank 300 con Icom IC-2730A. La unidad base y el panel de interruptores de 4 vías son idénticos en todas las variantes; solo el adaptador de la placa frontal cambia para coincidir con las dimensiones de su radio para un ajuste al ras, similar al de fábrica.
No, esta es una instalación no destructiva. El soporte reemplaza su soporte de gafas OEM utilizando los orificios de tornillo de fábrica existentes en el marco del techo. Simplemente retire la carcasa original, pase los cables de la radio y el interruptor a través del revestimiento interior y asegure la nueva base con los tornillos originales o los extendidos proporcionados. Esto preserva el valor de reventa y permite una reversibilidad del 100%.
La instalación implica siete pasos principales: desensamblar el módulo OEM, pasar el cableado oculto a través del pilar A, ensamblar la placa frontal, conectar la radio y el panel de interruptores, montar la unidad base, configurar el soporte magnético para micrófono y probar la alimentación y los controles. La mayoría de los instaladores aficionados pueden completarlo en 2 a 4 horas, dependiendo de la familiaridad con la extracción del revestimiento interior y el enrutamiento de cables. Recomendamos tomarse su tiempo con el paso del cableado para asegurar conexiones limpias y seguras.
Ofrecemos adaptadores de placa frontal modulares para radios Yaesu, Icom, Zastone y Hengxun. El paquete incluye tres adaptadores intercambiables (Yaesu/Icom/Zastone) y una opción de Hengxun según su selección de SKU. Si tiene una marca de radio diferente, contáctenos con el número de modelo y las dimensiones de su radio; es posible que podamos conseguir o adaptar un adaptador para usted.
El paquete incluye la unidad base del soporte de radio de techo, el panel de interruptores de 4 vías, el soporte magnético para micrófono con parche adhesivo, tres adaptadores de placa frontal intercambiables, un kit de hardware con tornillos extendidos, herramientas de recorte para la instalación, un surtido de tubos termorretráctiles y conectores e aislantes de cableado. Todo lo necesario para una instalación completa está incluido; no se requieren compras de hardware adicionales.
El soporte magnético para micrófono cuenta con imanes integrados de alta resistencia diseñados para sujetar de forma segura su micrófono de mano sin que se suelte, incluso en caminos irregulares. La instalación es sencilla: limpie la parte posterior de su micrófono de radio, coloque el parche adhesivo magnético provisto y encaje el micrófono en la base superior. Recomendamos probar la atracción magnética antes de su primera conducción para asegurar una sujeción firme.
Usa el selector de vehículo en la parte superior de esta página para confirmar la compatibilidad con tu año, marca y modelo específicos. Si tu vehículo no está listado o no estás seguro, contáctanos en support@evparts4x4.com con tu VIN — confirmaremos la compatibilidad en 24 horas. Nuestra política de Ajuste Garantizado significa que si hay un problema de compatibilidad de nuestra parte, lo solucionaremos.
Los pedidos se procesan y despachan en 2-4 días hábiles. Las piezas estándar se envían por correo aéreo y normalmente llegan en 10-15 días hábiles; las piezas de carrocería más grandes se envían por flete marítimo y tardan alrededor de 30-45 días hábiles. El envío es gratis en pedidos superiores a $100. Recibirás un número de seguimiento una vez que tu pedido sea enviado, y puedes rastrearlo en cualquier momento aquí. Detalles completos en nuestra Política de Envío.
Sí — ofrecemos una ventana de devolución de 30 días desde la fecha de entrega, y no cobramos ningún cargo de reposición. Si un artículo llega dañado o no es correcto por nuestra parte, organizaremos un reemplazo o reembolso completo y cubriremos el envío de devolución. Para los términos completos, consulta nuestra Política de Devolución y Reembolso o inicia una devolución a través de nuestra página de RMA.
No proporcionamos instalación directamente, pero la mayoría de nuestras piezas están diseñadas para una instalación DIY directa — la guía paso a paso está en la pestaña de Guía de Instalación arriba. Para piezas complejas (por ejemplo, frenos, suspensión, sistemas eléctricos), recomendamos que un mecánico calificado realice la instalación. Si tienes preguntas técnicas durante la instalación, nuestro equipo de soporte está feliz de ayudar en support@evparts4x4.com.
