
A ferramenta que você precisa
Suas novas pastilhas e rotores estão prontos para serem usados. Mas há um problema. Ao tentar encaixar a pinça sobre as novas e mais espessas pastilhas de freio, ela não se move. O pistão está travado.
Todo mecânico DIY (faça você mesmo) enfrenta este momento. A solução não é mais força. É a ferramenta certa.
Uma ferramenta de pistão de pinça de freio resolve esse problema como um profissional. Este guia explica o que é, que tipo seu carro precisa e como usá-lo com segurança. Sem erros caros.
Por que você não pode “forçar”
Forçar um pistão de freio de volta com um sargento ou alavanca causa danos. Compreender o sistema hidráulico mostra por que uma ferramenta especializada não é opcional. É necessária para a segurança e eficácia.
O ponto de dor comum

Vemos essa pergunta em todos os lugares nos fóruns. Um usuário no r/MechanicAdvice recentemente postou: “Estou tentando trocar minhas pastilhas, mas o pistão não volta!”
Essa frustração acontece o tempo todo. Um mecânico DIY passou uma hora tentando forçar um pistão de volta com uma braçadeira grande. Ele rasgou a delicada coifa do pistão. Esse pequeno erro significou uma substituição da pinça muito mais cara.
Como funciona a pressão hidráulica
Seu sistema de freio funciona com a Lei de Pascal. O fluido em suas linhas de freio não comprime.
Quando você empurra o pistão de volta para sua sede, você força esse fluido hidráulico a subir pelas linhas. Ele vai para o reservatório do cilindro mestre.
A força descontrolada pode danificar as precisas vedações internas da pinça. Pode entortar o pistão em sua sede ou até mesmo danificar o cilindro mestre. Uma ferramenta especializada evita isso.
A precisão da ferramenta certa
Uma ferramenta de compressão de pistão de pinça de freio aplica pressão lenta e uniforme diretamente no centro da face do pistão.
Essa força controlada é crítica. Ela garante que o pistão recue diretamente para o orifício da pinça sem inclinar. Isso protege as vedações internas, que lidam com a pressão de dentro, não com a força irregular de fora.
Qual é a melhor ferramenta?
Escolher a ferramenta de pinça de freio correta é importante porque as pinças dianteiras e traseiras geralmente precisam de mecanismos diferentes. A escolha certa economiza tempo, dinheiro e uma viagem de volta à loja de autopeças.
Ferramenta para freios dianteiros

Para a maioria dos trabalhos de freio dianteiro, você precisa de uma ferramenta de pinça de pistão único. Ela é frequentemente chamada de espalhador de freio a disco.
O design é simples e forte. Uma haste roscada com um punho gira uma grande placa, que empurra diretamente a face do pistão.
Esta ferramenta funciona perfeitamente para as pinças flutuantes de pistão único ou duplo encontradas nas rodas dianteiras da maioria dos carros, caminhões e SUVs.
Ferramenta para freios traseiros
As pinças traseiras geralmente têm o mecanismo do freio de estacionamento embutido diretamente no pistão da pinça. Isso significa que você não pode simplesmente empurrar o pistão reto para trás.
Você deve girar o pistão enquanto o comprime. Isso retrai um mecanismo de parafuso interno. Isso responde à pergunta comum: “Por que você tem que girar um pistão de pinça de freio traseiro?”
Para este trabalho, você precisa de uma ferramenta de rebobinagem de pistão de pinça de freio. Elas vêm como um simples adaptador “cubo” que se encaixa em uma chave de catraca. Ou você pode obter um kit universal mais abrangente com vários adaptadores para diferentes veículos.
Tabela Comparativa de Ferramentas
Aqui está uma comparação direta dos dois principais tipos de ferramentas para simplificar sua escolha.
|
Tipo de Ferramenta |
Caso de Uso Principal |
Mecanismo |
Tipo de Veículo Comum |
|
Espalhador de Pistão / Ferramenta de Compressão |
Pinças de Freio Dianteiras |
Empurra o pistão para trás |
A maioria dos carros, caminhões, SUVs (dianteiro) |
|
Rebobinador de Pistão / Ferramenta de Retorno |
Pinças de Freio Traseiras (com freio de estacionamento integrado) |
Gira e empurra o pistão |
Muitos carros FWD, alguns RWD (Traseiro) |
De acordo com bancos de dados de reparos automotivos, mais de 60% dos carros de passeio modernos agora usam um mecanismo de retorno em suas pinças traseiras. Isso torna uma ferramenta de retorno essencial para o kit de ferramentas de um mecânico DIY moderno. Uma discussão no DIYChatroom mostra quantos iniciantes são pegos de surpresa por esse design.
Como usar uma ferramenta de compressão
Usar uma ferramenta de compressão de pistão de pinça de freio é simples. Siga estas etapas para um resultado seguro e bem-sucedido todas as vezes. Esta seção funciona como um tutorial passo a passo.
Preparação Essencial
Antes de tocar na pinça, a configuração adequada garante sua segurança.
Fixe o veículo em terreno nivelado com macacos de alta qualidade. Nunca trabalhe embaixo de um carro suportado apenas por um macaco.
Remova a roda. Desparafuse os dois pinos deslizantes da pinça ou os parafusos de montagem.
Deslize suavemente a pinça para fora do rotor. Não a deixe pendurada pela mangueira de freio. Use um gancho de pinça ou um elástico para suportar seu peso na haste ou no chassi.
Remova as pastilhas de freio antigas e desgastadas do suporte da pinça.
Abra o capô e afrouxe a tampa do reservatório do cilindro mestre. Coloque um pano limpo ao redor da abertura para absorver qualquer possível transbordamento de fluido ao comprimir o pistão.
O processo de compressão
A sensação deste processo diz muito. Você deve sentir uma resistência suave e consistente. Se sentir qualquer rangido, travamento ou uma parada brusca repentina, pare de aplicar pressão imediatamente e investigue a causa.
Posicione a Ferramenta: Coloque a pastilha de freio interna antiga contra a face do pistão. Isso protege a superfície do pistão de ser arranhada pela ferramenta.
Engate a Ferramenta: Posicione a ferramenta de compressão do pistão da pinça de freio de forma que sua placa fixa repouse na parte de trás do corpo da pinça e a placa acionada por parafuso esteja contra a pastilha antiga.
Aplique Pressão Suave: Gire lenta e constantemente a alavanca da ferramenta no sentido horário.
Monitore o Pistão: Observe enquanto o pistão retrai suavemente para o orifício da pinça. Certifique-se de que a coifa de borracha não esteja sendo pinçada ou torcida.
Comprima Totalmente: Continue girando até que o pistão esteja totalmente assentado. Isso cria a folga necessária para a instalação das novas e mais espessas pastilhas de freio.
Remova a Ferramenta: Uma vez que o pistão esteja totalmente retraído, gire a alavanca no sentido anti-horário para liberar a pressão e remover a ferramenta.
Finalizando
Com o pistão retraído, agora você pode instalar suas novas pastilhas de freio e ferragens.
Reinstale a pinça sobre as novas pastilhas e aperte os parafusos com o torque especificado pelo fabricante.
Antes de dirigir, este passo não é opcional: bombeie o pedal do freio várias vezes até que ele fique firme. Isso assenta as pastilhas contra o rotor e restaura a pressão hidráulica no sistema.
Dominando a ferramenta de retorno
As pinças traseiras com freios de estacionamento integrados necessitam de uma técnica diferente. Tentar usar uma ferramenta de compressão padrão causará danos.
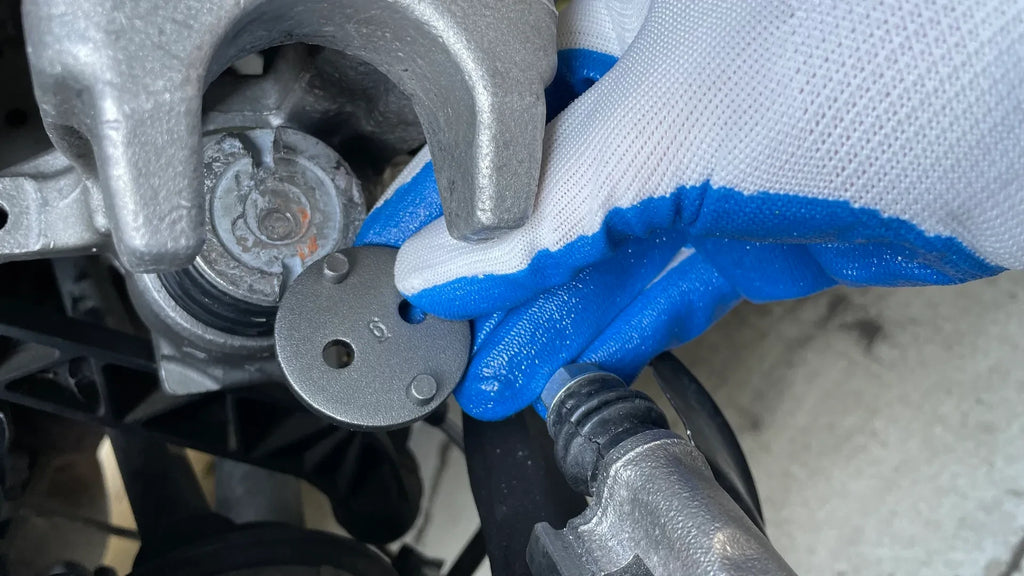
Identificando um pistão de retorno
O próprio pistão indica qual ferramenta ele precisa. Um pistão de retorno tem duas ou mais reentrâncias ou entalhes em sua face.
Esses entalhes se encaixam nos pinos de um adaptador de ferramenta de retorno, permitindo que você o gire.
Usando a ferramenta de rebobinagem
Um kit de ferramenta de rebobinagem universal pode parecer complexo, mas usá-lo é lógico e sistemático.
Selecione o Adaptador Correto: Verifique os adaptadores em seu kit. Encontre aquele com pinos que correspondam ao espaçamento dos entalhes no pistão da sua pinça.
Monte a Ferramenta: Fixe o adaptador escolhido na extremidade da haste roscada da ferramenta. Ele normalmente travará no lugar.
Posicione a Ferramenta: Coloque a ferramenta na pinça. Os pinos do adaptador devem se encaixar firmemente nos entalhes do pistão, e a placa de reação da ferramenta deve repousar plana contra a parte traseira sólida da pinça.
Gire e Comprima: Comece a girar a alavanca principal da ferramenta. Essa ação aplica simultaneamente uma leve pressão para frente enquanto gira o pistão, geralmente no sentido horário.
Essa ação dupla é crítica. Você está retraindo o pistão ao longo de sua rosca interna, semelhante a girar uma porca para fora de um parafuso. Forçá-lo diretamente destruirá o mecanismo do freio de estacionamento.
Retraia Totalmente: Continue girando até que o pistão esteja nivelado com o alojamento da pinça, então remova a ferramenta. O processo está agora concluído.
Dicas Profissionais e Resolução de Problemas
Mesmo com a ferramenta certa, você pode encontrar problemas. Aqui estão soluções para problemas comuns, baseadas em anos de experiência profissional.
Meu pistão está travado
Se o pistão se recusa a mover, mesmo com a ferramenta apropriada, não aplique força excessiva.
Primeiro, tente abrir o parafuso de sangria. Com uma mangueira conectada ao parafuso e levando a um recipiente de coleta, abra levemente o sangrador. Agora, tente comprimir o pistão novamente. Isso libera fluido diretamente na pinça, mas esteja avisado: você precisará sangrar os freios depois.
Se ainda assim não se mover, o pistão pode estar travado devido à ferrugem ou detritos. Neste ponto, a pinça provavelmente precisa ser reconstruída ou substituída.
O erro número 1 do faça-você-mesmo
O erro mais comum e dispendioso é rasgar a coifa de borracha do pistão. Esta coifa mantém água e sujeira da estrada fora do alojamento da pinça.
Antes de comprimir, limpe suavemente o pistão exposto e a coifa. Use uma pequena ferramenta de ponta romba para levantar cuidadosamente a borda da coifa para longe do pistão e aplique uma pequena quantidade de lubrificante de silicone seguro para freios. Isso ajuda a coifa a deslizar sem torcer ou rasgar.
Um mecânico amador nos fóruns do Garage Journal documentou como uma coifa rasgada transformou uma simples troca de pastilhas em uma pinça travada em poucos meses. A umidade entrou na rachadura, causando corrosão que travou o pistão no lugar.
Se a pinça estiver danificada
Se você descobrir que o pistão está travado, a coifa está muito rasgada ou a pinça foi danificada pelo uso de ferramentas incorretas, a substituição é o caminho mais seguro e confiável a seguir.
Para uma substituição confiável e de alto desempenho, considere opções como uma pinça de freio BYD de alta qualidade, que garante o ajuste adequado e a durabilidade a longo prazo para o sistema de freios do seu veículo.
A ferramenta certa para um trabalho bem feito
Fazer um trabalho de freio é uma das tarefas mais recompensadoras para um mecânico DIY, mas não deixa margem para erros. A ferramenta de pistão da pinça de freio não é um luxo. É um requisito fundamental para fazer o trabalho de forma correta e segura.
Ao entender a diferença entre ferramentas de compressão e de retorno, e ao seguir um processo cuidadoso e passo a passo, você pode abordar este projeto com confiança. Você tem o conhecimento para garantir que o sistema de segurança mais crítico do seu veículo seja reparado com um padrão profissional.


