


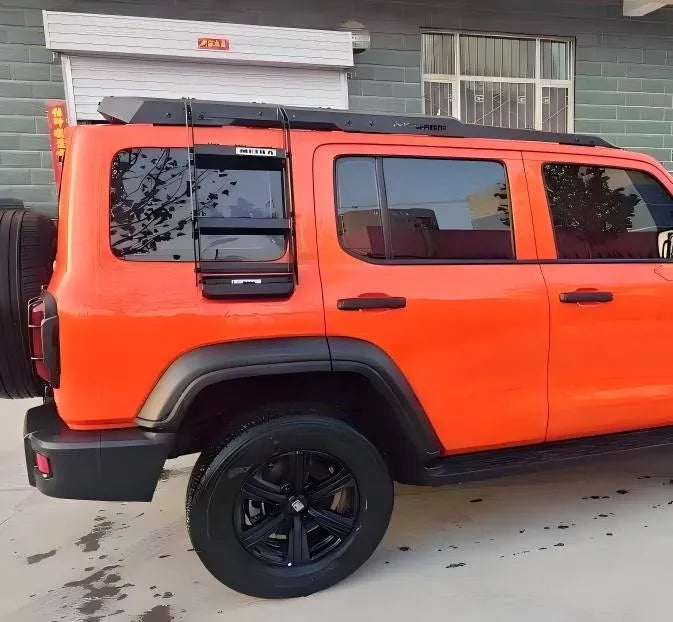
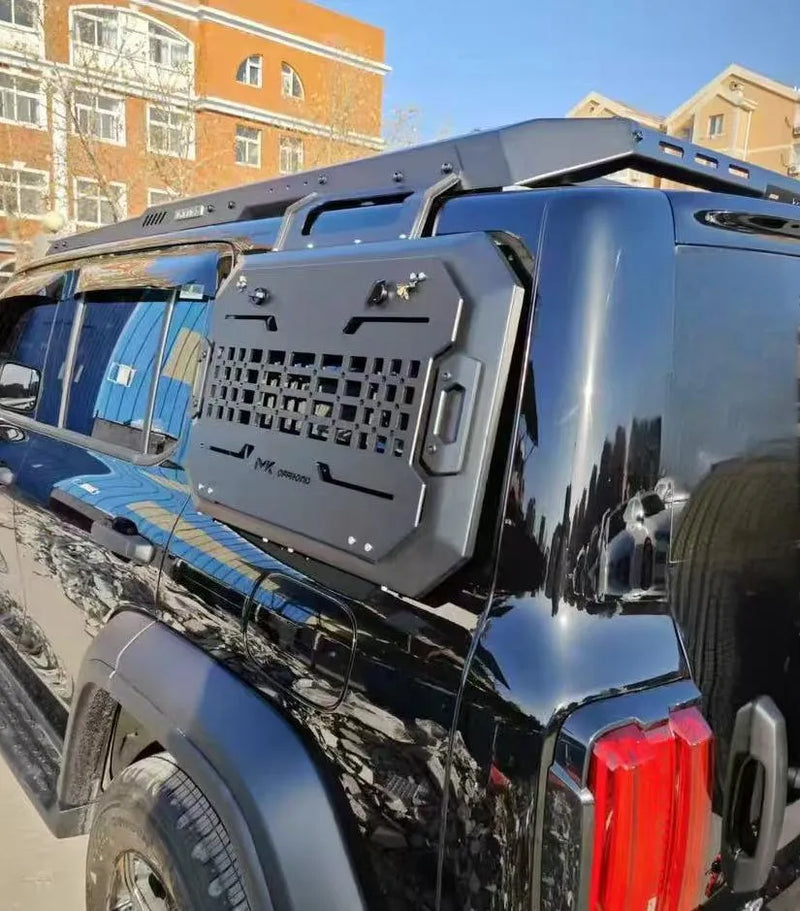
- No-Drilling Installation: Custom-engineered clamps attach directly to factory side rails without permanent modifications, drilling, or body cutting.
- 360° Camera Compatible: Low-profile aerodynamic design preserves full field of view for panoramic cameras and shark-fin antennas.
- Heavy Load Capacity: Supports dynamic loads up to 75kg–100kg (165lbs–220lbs), perfect for roof tents, awnings, and recovery gear.
- Aerodynamic Profile: Wing-shaped bars minimize wind resistance and eliminate whistling noise at highway speeds.
- All-Weather Durability: High-grade aluminum alloy with UV-resistant matte black powder coating resists corrosion in extreme environments.
- Universal T-Slot Compatibility: Standard top T-slots integrate seamlessly with bike racks, kayak carriers, and cargo boxes from major brands.


Heavy-Duty Roof Rack Cross Bars for GWM Tank 300
Regular price
$952.50
Sale price
$952.50
Regular price
$999.00
Unit price
Save 5%
Quick Answer
60-second summary
Heavy-duty aluminum roof rack cross bars for GWM Tank 300 with no-drilling installation and 75–100kg load capacity. Features 360° camera compatibility, aerodynamic wing-shaped design, and universal T-slot mounting for bike racks and cargo boxes.
Install time
45-60 minutes
Drilling
No - bolt-on
Warranty
Yes - non-invasive
Guaranteed Fit — Zero Purchase Risk
Verified for your vehicle. If these parts don't fit, we cover return shipping and issue a full refund. No questions asked.
Confirm this fits your vehicle
Volume Discount — More Sets, More Savings
1 Set
Standard price
$952.50
2 Sets
Save 10% — $857.25 each
$1,714.50
$1,905.00
3 Sets
Save 15% — $809.63 each ★ Best value
$2,428.88
$2,857.50
-
Estimated delivery:Jul 30 - Aug 03
-
Overweight products (over 10 kg) are shipped by sea freight, carefully packed and delivered by local carriers. The exact shipping time will be confirmed after order confirmation.

Heavy-Duty Roof Rack Cross Bars for GWM Tank 300
Precision Fit Guaranteed
Every part verified against OEM vehicle data. Guaranteed to fit your vehicle — or we cover return shipping and issue a full refund.
Engineered for EV Platforms
Parts designed for BYD, Tesla, MG, GWM, and KIA — OEM-spec quality, tested for EV electrical systems and caliper compatibility.
Your Parts, Your Terms
Split payments with Zip, Afterpay, or Shop Pay. Zero-interest options — approved in seconds at checkout, no forms required.
Features & Benefits
What's Included
Product Gallery
Confirmed compatible vehicles for this part. Use the vehicle selector above to verify fitment for your specific car.
| Year Range | Brand | Model |
|---|---|---|
| 2021-2026 | GWM | Tank 300 |
⚠ Compatibility note
For specific model/year/variant compatibility, please send your VIN or vehicle details to support@evparts4x4.com — we'll confirm fitment within 24 hours.
Not sure about compatibility? Contact us — we'll confirm within 24 hours.
Total time
45-60 minutes
Drilling required
No - bolt-on
Warranty
Yes - non-invasive
Yes, this heavy-duty roof rack is engineered specifically for GWM Tank 300 models from 2021–2026. The no-drilling installation uses custom-engineered clamps that attach directly to your factory side rails, so no modifications to your vehicle are needed.
We offer five configurations to match your needs. SKU1 (MK Frontier Luggage Rack) is the crossbars alone. SKU2 (MK Sentry Side Climb) adds a climbing ladder. SKU3 bundles the crossbars with the Sentinel Ladder. SKU4 includes crossbars, ladder, and Side Window Mecha Net for maximum cargo and access capability. SKU5 (MK Rear Side Window Armor) is a protective panel sold separately. Choose based on whether you need ladder access, side protection, or just the core rack.
Yes — the rack supports dynamic loads up to 75kg–100kg (165lbs–220lbs), which is sufficient for roof tents, awnings, recovery gear, and other adventure equipment. We recommend distributing weight evenly across the crossbars and verifying stability during the final inspection step in the installation guide.
No — the rack features a low-profile aerodynamic design that preserves the full field of view for panoramic cameras and shark-fin antennas. The installation manual includes a final inspection step to verify clearance around your 360° camera, so you can confirm compatibility before loading.
Installation typically takes 30–45 minutes and requires only basic hand tools (wrench or socket set). The no-drilling design means no power tools or drilling equipment is needed. All mounting hardware and a complete installation manual are included in the package, and the process involves six straightforward steps: verifying components, preparing mounting points, attaching base struts, installing crossbars, testing load distribution, and final inspection.
The crossbars are constructed from high-grade aluminum alloy with a UV-resistant matte black powder coating, designed to resist corrosion in extreme environments. This combination provides durability for off-road and adventure use while maintaining a clean, professional appearance.
The package includes one pair of crossbars, base strut assembly, mounting bracket set, hardware kit (bolts, spacers, washers), and an installation manual. The crossbars feature universal T-slot compatibility, so you can integrate bike racks, kayak carriers, and cargo boxes from major brands to customize your setup.
Use the vehicle selector at the top of this page to confirm fitment for your specific year, brand, and model. If your vehicle is not listed or you're unsure, contact us at support@evparts4x4.com with your VIN — we'll confirm compatibility within 24 hours. Our Guaranteed Fit policy means if a compatibility issue is on our end, we'll make it right.
Orders are processed and dispatched within 2-4 business days. Standard parts ship via Air Parcel and typically arrive in 10-15 business days; larger body parts ship via Sea Freight and take around 30-45 business days. Shipping is free on orders over $100. You'll receive a tracking number once your order ships, and can track it anytime here. Full details in our Shipping Policy.
Yes — we offer a 30-day return window from the delivery date, and we don't charge any restocking fees. If an item arrives damaged or isn't quite right on our end, we'll arrange a replacement or full refund and cover the return shipping. For the complete terms, please see our Return & Refund Policy or start a return via our RMA page.
We don't provide installation directly, but most of our parts are designed for straightforward DIY installation — the step-by-step guide is in the Installation Guide tab above. For complex parts (e.g. brakes, suspension, electrical systems), we recommend having a qualified mechanic perform the installation. If you have technical questions during installation, our support team is happy to help at support@evparts4x4.com.
