


- Fear No Water: High-mount intake prevents engine flooding during deep wading and water crossings.
- Dust-Free Air: Protects engine components from dust and debris, extending service life and reducing maintenance.
- Power Upgrade: Streamlined airflow delivers cooler, cleaner air for improved throttle response and engine performance.
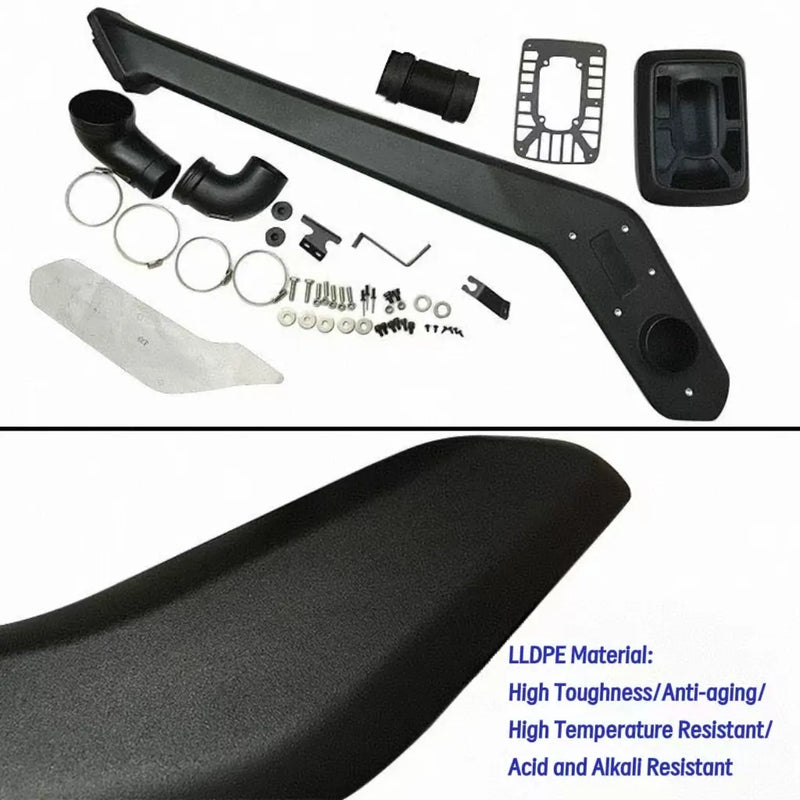
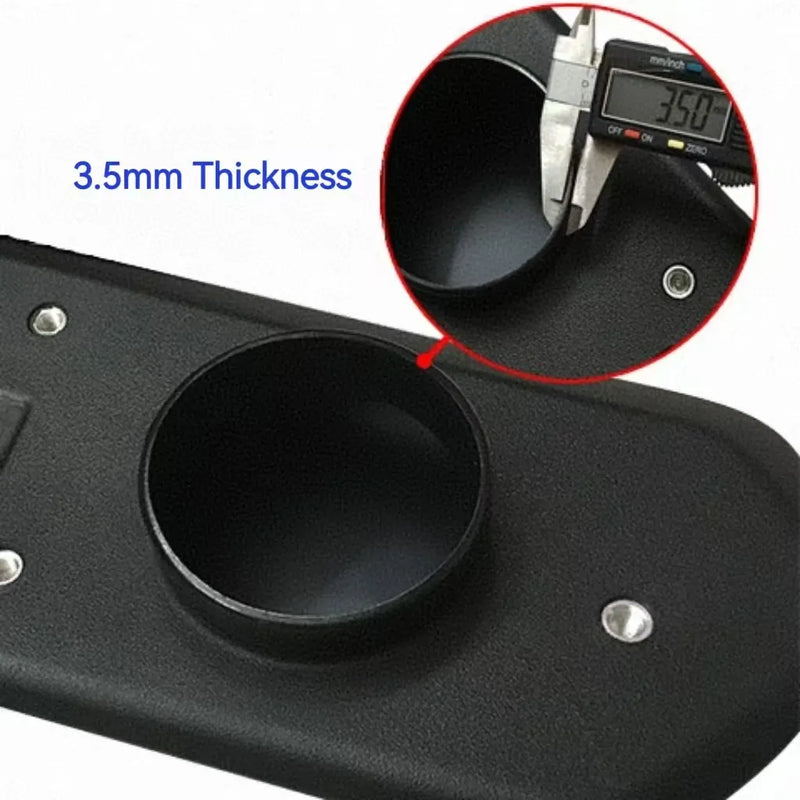
- Built Tough: High-quality LLDPE construction resists UV damage, impacts, and extreme heat and cold conditions.
- Perfect Match: Designed exclusively for GWM Cannon models for a factory-finish look and seamless integration.
- Easy Installation: Complete kit includes all gaskets, hoses, and hardware needed for straightforward mounting.


Gwm Cannon Wading Hose
Regular price
$285.00
Sale price
$285.00
Regular price
Unit price
Save
Quick Answer
60-second summary
High-mount intake wading hose system for GWM Cannon models (2021-2026) featuring LLDPE construction that prevents engine flooding during water crossings while delivering cooler, cleaner air for improved performance. Complete kit includes all gaskets, hoses, and hardware for factory-finish integration.
Install time
90-120 minutes
Drilling
Yes - 4 holes
Warranty
Caution - check dealer
Guaranteed Fit — Zero Purchase Risk
Verified for your vehicle. If these parts don't fit, we cover return shipping and issue a full refund. No questions asked.
Confirm this fits your vehicle
Volume Discount — More Sets, More Savings
1 Set
Standard price
$285.00
2 Sets
Save 10% — $256.50 each
$513.00
$570.00
3 Sets
Save 15% — $242.25 each ★ Best value
$726.75
$855.00
-
Estimated Delivery:Jul 31 - Aug 04
-
Free Air Express Shipping on orders over $100!

Gwm Cannon Wading Hose
Precision Fit Guaranteed
Every part verified against OEM vehicle data. Guaranteed to fit your vehicle — or we cover return shipping and issue a full refund.
Engineered for EV Platforms
Parts designed for BYD, Tesla, MG, GWM, and KIA — OEM-spec quality, tested for EV electrical systems and caliper compatibility.
Your Parts, Your Terms
Split payments with Zip, Afterpay, or Shop Pay. Zero-interest options — approved in seconds at checkout, no forms required.
Features & Benefits
What's Included
Product Gallery
Confirmed compatible vehicles for this part. Use the vehicle selector above to verify fitment for your specific car.
| Year Range | Brand | Model |
|---|---|---|
| 2021-2026 | GWM | Cannon |
| 2023-2026 | GWM | Cannon_L |
| 2023-2026 | GWM | Cannon_X |
⚠ Compatibility note
Cannon_L and Cannon_X variants are model-specific (2023-2026 only). For confirmation of fitment on your specific Cannon variant and year, please send your VIN to support@evparts4x4.com — we'll verify compatibility within 24 hours.
Not sure about compatibility? Contact us — we'll confirm within 24 hours.
Total time
90-120 minutes
Drilling required
Yes - 4 holes
Warranty
Caution - check dealer
Yes, this wading hose is designed for GWM Cannon models from 2021-2026, so your 2024 Cannon is fully compatible. We offer three SKU variants—Gwm Cannon, Gwm Cannon_L, and Gwm Cannon_X—so make sure you select the correct variant for your specific Cannon model to ensure proper fitment.
The Gwm Cannon variant fits 2021-2026 Cannon models. The Gwm Cannon_L and Gwm Cannon_X are newer variants designed for 2023-2026 models and are specific to the Cannon_L and Cannon_X trim levels respectively. Each SKU includes all necessary gaskets, hoses, and hardware tailored to your model, so selecting the correct variant ensures seamless integration and factory-finish appearance.
Yes, installation requires drilling mounting holes into the fender and A-pillar to mount the snorkel body. The kit includes a template to guide your drilling points, and we recommend using low speed when drilling to protect the paint finish. After drilling, apply rust inhibitor to all exposed metal edges immediately to prevent corrosion.
The installation process involves six main steps: preparing the template, drilling mounting holes, mounting the snorkel body, connecting the plumbing to your airbox, aligning the snorkel, and installing the Air Ram head. While the exact time depends on your mechanical experience and tools available, most owners can complete the installation in a single day by following the step-by-step guide provided with the kit.
The wading hose is constructed from high-quality LLDPE, which resists UV damage, impacts, and extreme heat and cold conditions. This durable material ensures the hose maintains its integrity during deep water crossings and prolonged outdoor exposure, protecting your engine while delivering reliable performance across a range of Australian climates.
The kit includes a complete GWM Cannon Wading Hose assembly with gaskets and accessories, a hardware kit with mounting brackets and clamps, and an installation template to guide your drilling points. All gaskets, hoses, and fasteners needed for straightforward mounting are included, so you won't need to source additional parts.
The high-mount intake design positions the air intake point higher on the vehicle, keeping it above the water level during deep wading and water crossings. This prevents water from entering the engine's intake system, which can cause hydro-locking and severe engine damage. Additionally, the streamlined airflow delivers cooler, cleaner air, which improves throttle response and overall engine performance while the dust-filtering design protects engine components from debris.
Use the vehicle selector at the top of this page to confirm fitment for your specific year, brand, and model. If your vehicle is not listed or you're unsure, contact us at support@evparts4x4.com with your VIN — we'll confirm compatibility within 24 hours. Our Guaranteed Fit policy means if a compatibility issue is on our end, we'll make it right.
Orders are processed and dispatched within 2-4 business days. Standard parts ship via Air Parcel and typically arrive in 10-15 business days; larger body parts ship via Sea Freight and take around 30-45 business days. Shipping is free on orders over $100. You'll receive a tracking number once your order ships, and can track it anytime here. Full details in our Shipping Policy.
Yes — we offer a 30-day return window from the delivery date, and we don't charge any restocking fees. If an item arrives damaged or isn't quite right on our end, we'll arrange a replacement or full refund and cover the return shipping. For the complete terms, please see our Return & Refund Policy or start a return via our RMA page.
We don't provide installation directly, but most of our parts are designed for straightforward DIY installation — the step-by-step guide is in the Installation Guide tab above. For complex parts (e.g. brakes, suspension, electrical systems), we recommend having a qualified mechanic perform the installation. If you have technical questions during installation, our support team is happy to help at support@evparts4x4.com.
